
PERSPECTIVE |
This section focuses on a key responsibility of the professional comic book penciler - perspective! The purpose of this section is to introduce these concepts to you in a simply way, enabling you to begin to apply them to your work! Let's begin with some...
DEFINITIONS
|
There you have it! I know it's beginning to sound like a geometry class in here, but it makes it easier to just use the proper terminology in the tutorial! Piece of cake! So let's get to it!! |

|
| Believe it or not -- the secret to understanding perspective lies in the CUBE!! Any and all objects will fit inside a box! If you've ever had to pack for a move, you know it's true! And what is a box?? That's right -- a cube! Take a look at the cover to Nightwing #4 (above). Notice the design of the background -- it's as if the characters were fighting in a box! So no matter what your subject, know that it will always fit inside a cube -- if the cube is big enough! So -- all we have to do is figure out how to draw a simple cube in perspective! Once we understand that, we can construct any object we want inside that cube -- a building, a car, a person, a basketball, et cetera, ad infinitum! We will do that near the end -- but for now, let's get into the cube!
|
|
|
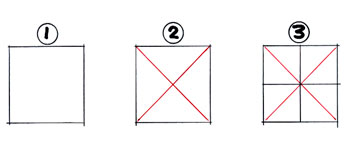
It all starts with the square! Although a rectangle works just as well (and we will use it later) - let's use a simple square for now. The common technique for dividing surfaces in perspective drawings is to use diagonals -- the intersection of the two diagonals inside the square (or rectangle!) locates the middle of the surface, dividing that surface into four equal parts. This technique works even when the surface is in perspective!! See how the the square is divided? Easy! |

|
| Onto the cube! Consider the square to be the "footprint," or "floor plan," of our cube. Let's extend our square into a cube -- and note a few things.
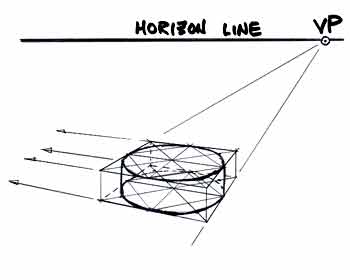
First, note that we now have to identify our horizon (eye level) and vanishing points. This is a two point perspective drawing -- so we place one vp to the left of the cube and one vp to the right of the cube. See how the lines that we know are actually parallel on a physical cube seem to converge as they are extended toward the horizon line? If we place our vanishing points too close together, our cube will look pinched. If we place our vanishing points too far apart, our cube will look fat. There is no formula for determining exact positions of the vanishing points -- you must rely on your eyes and visual experience. The left cube is closer to the left vp than it is to the right vp. This reveals more of the right face. The side most revealed has the vp the furthest away from the object. Let's check the right cube. The right cube is closer to the right vp than it is to the left vp. This reveals more of the left face. The side most revealed has the vp the furthest away from the object. So, when observing a real object, place an imaginary cube around it. The side of the cube that is more revealed tells you that the vp for that surface is farther from the object than the other vp! Confused? Don't be! This will become crystal clear as you work with vanishing points. |
Summary!See - it's not so bad so far! Why not celebrate your success with the cube by putting some of the iced variety in a cold drink of your choosing!? |
The Cylinder! I told you that you will be able to render even round things inside the cube -- and the first step to understanding that is to consider the cylinder!! | Don't be scared here -- you don't need to know geometry to do this (I'll do it for you)! | 
The cylinder starts with a simple circle! And if you can put a ball inside a box, you can put a circle inside a square! | Consider a circle inside a square. Divide the square into four equal parts by using diagonals. Add diagonals to the quarters of each square! Now, note the point marked A and the point marked B. Place a point half-way between points A and B on the diagonal. This limits the circle -- the circle will be inside this mark on each of the four diagonals! Why?? Well -- the mark on the diagonal is 3/4 (0.75 in decimal) the length of the vertical side of the quarter section, and 3/4 (0.75 in decimal) the length of the horizontal part of the quarter section. This line is on a 45 deg mark with respect to the circle center, and taking the cos45 and sin45 yields 0.707, which is just a little smaller than the simple guide we get by using the diagonals. Thus -- using the simple diagonal dividing of our square gives us a powerful technique to render a circle in perspective! But how do we get to a cylinder?? | 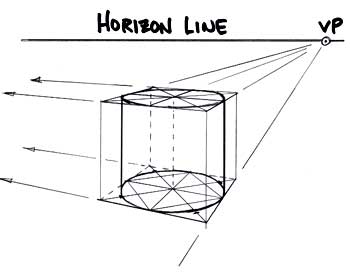
Onto the cylinder! Consider the square to be the "footprint," or "floor plan," of our cylinder. Place the circle inside the square, using the diagonal method. This circle becomes the bottom of our cylinder. Don't get nervous -- let's just rough the ellipse in by hand! Then, same as before, let's extend our square into a cube. Place a circle inside the top side of the cube. | Now -- connect the top and bottom circles (ellipses). Note that the vertical lines describing the sides of the cylinder are noticeably inside the vertical lines describing the edges of the cube! This technique works just as well if you decide to place the cylinder "lying down" inside the cube, in a rolling position! So, when observing a real object that is basically a cylinder (like a baseball bat, an escrima stick, or billy club), place an imaginary cube around it! Then, you can manipulate it any way you like!
| Summary!See - it's not so bad so far! Why not celebrate your success with the cylinder by opening one containing a cold drink of your choosing!? |
The Cone! I told you that you will be able to render even round things inside the cube -- and the next step to understanding that is to consider the cone!! The cone form is useful for understanding real objects, like a wine glass or building turret, or the nose cone of a rocket. | We're crusing now -- we already know everything we need to construct the cone! | 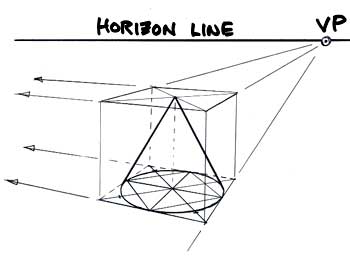
Onto the cone! Exactly as before, consider the square to be the "footprint," or "floor plan," of our cone. Place the circle inside the square using the diagonal method. This circle becomes the bottom of our cone. Don't get nervous -- let's just rough the ellipse in by hand! Then, same as before, let's extend our square into a cube. | This time, let's only place the diagonals on the top surface of the cube, instead of another circle as we did for the cylinder. Then, to create the sides of the cone, we extend a line from the outer edge of the bottom ellipse up to the centerpoint located by the intersection of the diagonals. This technique works just as well if you decide to place the cone "lying down" inside the cube, in a rolling position! So, when observing a real object that is basically a cylinder, place an imaginary cube around it! Then, you can manipulate it any way you like!
| Summary!See - we are flying now! Why not celebrate your success with the cone by having an ice cream cone!? |
The Sphere! I told you that you will be able to render even round things inside the cube -- and the next step to understanding that is to consider the sphere!! The sphere form is useful for understanding real objects, like a cannon ball or a basket ball, or the fat rounded nose of a jumbo jet. | We're crusing now -- we already know everything we need to construct the sphere!
| 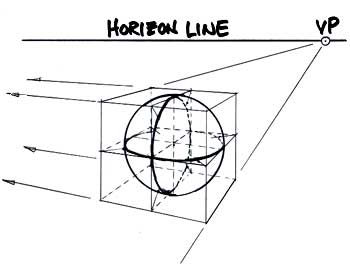
We begin with our old friend, the circle inside the square. This one pattern, repeated properly, gives us a perfectly divided sphere! | Consider the square to be the "footprint," or "floor plan," of our cylinder. Place the circle inside the square, using the diagonal method. This circle becomes only a guide (note that a ball touches the floor at only a point). Don't get nervous -- let's just rough the ellipse in by hand! Then, same as before, let's extend our square into a cube. Now, take the circle plan and "stand" it on edge! Lay out this plan on each vertical plane defined by the diagonals of the top and bottom surface. Lay out the circle plan on the horizontal plane half-way up the cube/sphere. A ball is a circle at the center in EVERY direction! At this point, we have a perfectly divided sphere. Why all this construction detail if we are only drawing objects with spherical contours, like balls????? Well - we are not always only concerned with the contour! What if you were the artist responsible for rendering the half-constructed Death Star in the Star Wars movie?? You could use this technique to create the framework of the construction -- adding and removing bits and pieces as needed to create a very realistic and very complicated perspective image!!
| Summary!See - there's no stopping you now! Why not celebrate your success with a quick game of basketball?? Go ahead -- you've earned it! I'll wait.... ! |
The Block! Well, here we are -- you now possess the knowledge to draw ANY shape in perspective! | This step is just a broadening of what you have learned -- widening our cube process to the block concept! A sculpter chisels off the unneccessary parts of his medium to reveal the form inside -- but we must think in the opposite way! We start with the form we want to render, breaking it up into the basic shapes (cube, cylinder, cone, sphere) and we construct a rectilinear framework around it -- like scaffolding. Except, don't limit yourself to using a cube. Use a rectangular block! This whole process gives us access to the inner construction of our subject. We can literally build our form -- from the inside out -- unlike the sculpter, who works from the outside in.
| 
Let's just modify one of the previous examples -- the cylinder! This time, let's make it a disk -- like a hockey puck! | We begin with our old friend, the circle inside the square, the "footprint," or "floor plan," of our puck. Place the circle inside the square, using the diagonal method, just as we did before! Now let's extend our square -- not into a cube, but into a thin block. We know that pucks are thinner than they are tall, so if we were to use a cube the puck would be waaaaay too thick! Place a circle inside the top side of the block. Now -- connect the top and bottom circles (ellipses). Voila -- instant puck! And because the guide lines are already established we can accurately place the NHL logo on it! Ahh, the benefits of the construction lines!
| Summary!See - there's no stopping you now! Why not celebrate your success with a quick game of hockey?? Go ahead -- you've earned it! I'll wait.... ! |
Practical Application: | You now possess the knowledge to draw ANY shape in perspective! Here is where we actually apply what we have learned! Our first application........
| 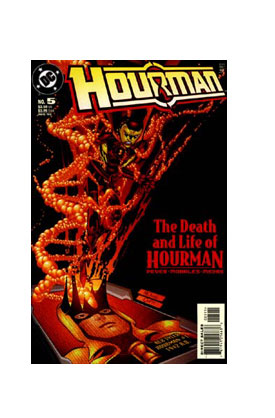
| Hourman #5 Cover design!
| 
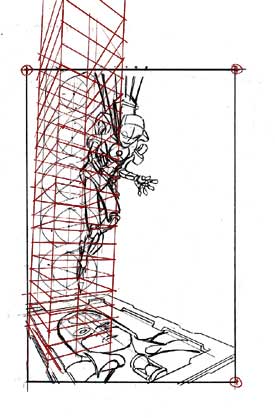
| I did 8 sketches for this particular cover, and this is the one editor Tony Bedard liked best! The point of this cover is to convey the character's history -- the current Hourman is constructed from the DNA material of the original Hourman. See how the DNA material is erupting from the symbol of the original Hourman, clumping and accumulating on the robotic endoskeleton of the current Hourman. Pretty cool, eh? Our task: to render in proper perspective the base unit and the framework of the erupting DNA double-helix! Whew!
| 
| I first selected a horizon. I wanted the base unit to be below, and the DNA erupting above, so I selected a horizon near the center of the image. When you set your horizon on the same vertical level as the center of interest, you are in a two point perspective application. Next, I determined the vanishing points for the base unit -- which depends on the rotation of the unit with respect to the viewer. Note that the right side of the base "block" is more revealed to us, thus the right vanishing point is farther away from the base than the left vp. Both vps are set on the horizon line, and the base is constructed in perspective. Note that I opted to rotate the base from it's position in the initial sketch. I felt that it would be more interesting if the figure was in-line with the base. Next, I tried a simple non-perspective rendition of the helix -- mainly because I knew that it would require more than a little bit of work to build its scaffolding! As you can see -- this simple helix looks unimpressive - it lacks the energy that the perspective brings to the art. So I began to place the scaffolding in the general area of the simple helix USING THE SAME VANISHING POINTS AS THE BASE!!!
| 
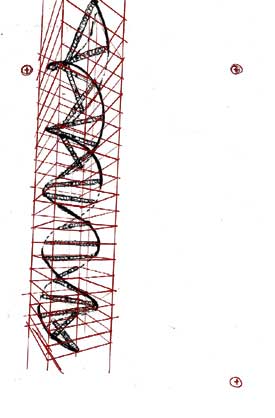
| Here is the scaffolding I constructed to build my double helix. It is just cross sectional planes uniformly spaced over the length of the helix. The diagonal technique can be used to extend a repeating pattern along a length. Or, you can determine the overall length, and use the diagonal technique to repeatedly divide the sections to be as close as desired. I usually use the latter method - for various reasons it usually is more accurate overall. Note the increasing distortion as the scaffolding gets farther away from the horizon. I chose to keep the vp's a bit close to punch up the effect of the perspective -- knowing that I was going to crop the scaffolding (the image) below the grossly distored area. This is going to happen with 2-point perspective - distortions increase as you move farther away from the horizon. That is why 3 point perspective is more accurate - it compensates for the dimension we have forced to remain parallel.
| 
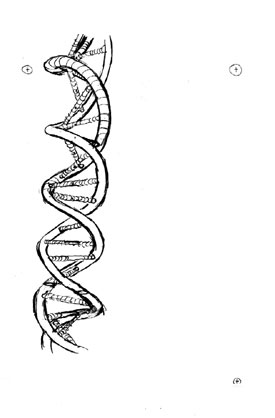
| Here is the simplified DNA helix mounted on the scaffolding I constructed. The point of this step is to place one spiral accurately with the other as they both move around in a circle along the lengh of the helix. The helix is just a circle that is spread out in length. Imagine our circle floor plan existing on each cross section. Start one spiral on the top cross-section. Mentally place a dot at the point where the circle meets the square on the outside edge. Then, move down one level, and place the second dot at that point just inside the AB midpoint. Then, connect the two dots - they are one level apart and 45 degrees rotated from each other! That's it! Just keep repeating that process down the length of the helix -- and we have it! Notice the chemical bar that connects the two strands. It's centerpoint on each cross section is identified by a dot -- and see that the bar rotates about that centerpoint by 45 degrees from cross-section to cross-section. I mentally used the diagonal method on each cross-section to ensure that the bar remained in constant length no matter its orientation. Notice too that the section of the helix that is closest to us is rendered very darkly -- and the section that is on the far side of the helix is rendered lightly. The hard part is over!!
| 
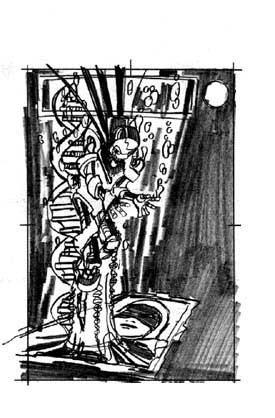
| Now that we have an accurately constructed helix, we can freely "beef it up!" I simply laid a fresh piece of paper over the previous double helix, and rendered it with a bit more of a sold, dimensional feel to it. Ultimately, I want the helix to look like clumps of molecules, so this will give me a neat little guide so I don't make some parts too thick and others too thin.
| 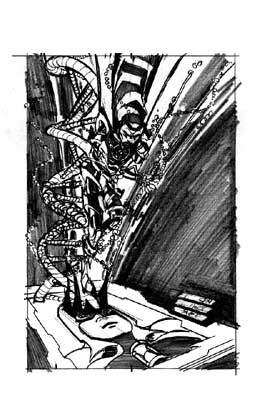
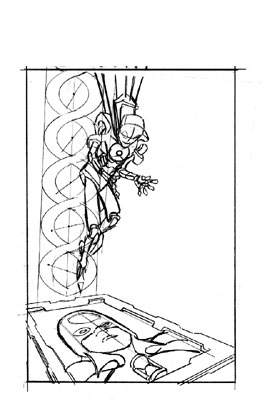
| Now to put it all together! I simply laid a fresh piece of paper over the initial layout and rendered with more detail the base and figure. I added back in the beefed up helix -- making sure that the vp's for the base and helix were identical. Lo and behold -- here's the layout! All the construction and perspective work is all done -- so I can simply get into the line art in the next step!
| 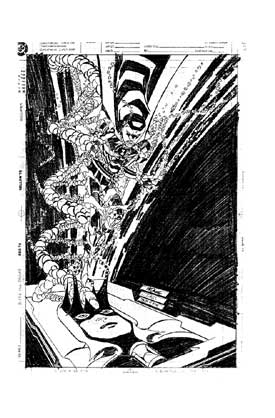
| Now to enjoy the fruits of our labor -- create the finished pencil drawing! I enlarged the layout to full size (in this case a total enlargement of 210%), and lightboxed it onto the bristol board.
|
| Here's the application in a nutshell! Enjoy the little JavaScript movie of our work! To view the movie, you must have Java Script enabled on your browser! If you see a static image, that means you have Java turned off or you have a slightly older browser!
|
| Summary!I hope this has helped show the Power of Perspective! You really need to know this stuff! Imagine how stupid this cover could have looked if I opted to go with the initial helix without using perspective! I'm shuddering at the thought!
|

|
Last Word!That's it! I told you it was easy!Perspective is a very important subject, and artists should know how to apply these basic principles to their art. I urge you to study this subject, and invest in a text on the subject. It's up to you! You can invest the time and energy now, and reap the benefits over the duration of your artistic career, or you can avoid the subject and struggle along for the duration of your artistic career. You can do it! Good luck!! |