
1-POINT PERSPECTIVE | Welcome to the wacky-world of 1-point perspective! This is a very simple but useful system for rendering certain 3-dimensional situations in a 2-dimensional medium! If you're starting here -- I recommend that you take a few minutes and go through the Perspective Primer on this site. It introduces you to some of the jargon and fundamental topics that are used here. Usually, when you design a shot that requires perspective, first consider if you are going to look directly into a vanishing point. Most often you will not, but if you ARE, then you may be able to accomplish your shot with 1 vanishing point. Consider for your shot if you can safely represent two of the 3 spatial dimensions as sets of parallel lines. If you can (when your eye level, or horizon line, is close to the level of your center of interest), then you are in a 1-point perspective application. Consider the following 3 examples.... and, oh yeah, before I forget..... Have fun!
|
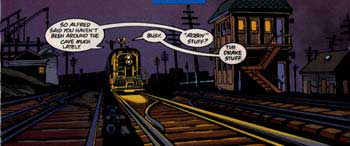
| Nightwing #25 Page 5A simple application of 1-point perspective. When the viewer is looking directly into the vanishing point -- that is a clue to use 1 - point perspective!
| 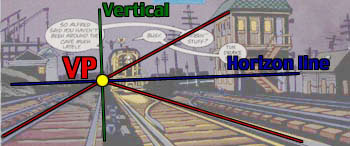
Objects in the distance are oriented square to the tracks and to each other. If you can imagine a grid on the ground, all the objects are placed so that all the surfaces are either parallel or perpendicular to each other, and to the grid. | Note that if any object is rotated by an amount other than 90 degree increments (say, by 41 degrees, or 32.7 degrees, etc.), that particular object will require a new set of vanishing points different from all the rest. That will be handled in a later example -- I just wanted to point it out here! So - let's analyze this shot: First, find the eye level. This is your horizon line. We know that our vp's lie on this line. (Did you notice that the eye level of this particular shot is pretty low -- just a bit above the rail??). Next, find the vanishing point location. We are on the tracks, looking down the length of the rails. Thus, we are looking into the vanishing point. Set it. Last, determine the vertical (plum) line. If you were standing in the scene, and you held out a plum line, the vertical would be that line. See how it's perpendicular to the horizon line? That's it! Then we render the detail in accordance with the system we just constructed. All the detail that is parallel to the tracks vanish at the indicated vanishing point. All the detail that is perpendicular to the track (and in the plane of the track) is rendered as parallel to the horizon line. All vertical detail is rendered parallel to the vertical line. Piece of cake!
| 
| Nightwing #25 Page 22A simple application of 1-point perspective. When the viewer is looking directly into the vanishing point -- that is a clue to use 1 - point perspective!
| 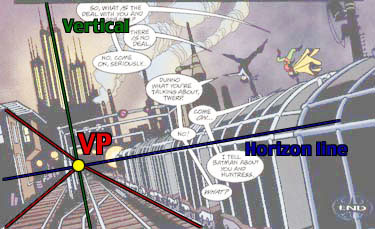
Again, all the objects in the distance are oriented square to the tracks and to each other. If you can imagine a grid on the ground, all the objects are placed so that all the surfaces are either parallel or perpendicular to each other, and to the grid. | So - let's analyze this shot: First, find the eye level. This is your horizon line. We know that our vp's lie on this line. (Did you notice that the eye level of this particular shot is higher than a typical human height?? Notice where the eye level cuts across the car Nightwing is riding. If he flipped off the side of the car, and stood on the ground there -- the eye level line would be well over his head! So when you are thinking about eye level, imagine you are in one of those cameraman chairs on a big boom -- you can maneuver up high as well as down low, so you are not limited to the height of a person!). Next, find the vanishing point location. We are in the hallway, looking down its length. Thus, we are looking into the vanishing point. Set it. Last, determine the vertical (plum) line. If you were standing in the scene, and you held out a plum line, the vertical would be that line. See how it's perpendicular to the horizon line? That's it! Then we render the detail in accordance with the system we just constructed. All the detail that is parallel to the tracks vanish at the indicated vanishing point. All the detail that is perpendicular to the track (and in the plane of the track) is rendered as parallel to the horizon line. All vertical detail is rendered parallel to the vertical line. Piece of cake!
| 
| Nightwing #26 Page 15A simple application of 1-point perspective. When the viewer is looking directly into the vanishing point -- that is a clue to use 1 - point perspective!
| 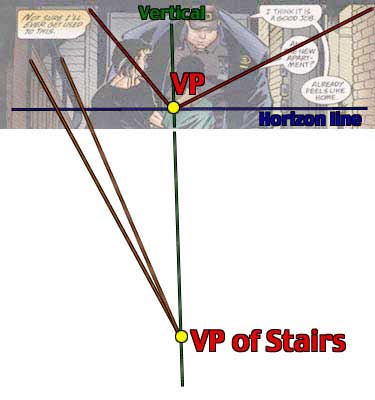
Again, all the objects in the distance are oriented square to the hallway and to each other. If you can imagine a grid on the ground, all the objects are placed so that all the surfaces are either parallel or perpendicular to each other, and to the grid. | The notable exception is the stairwell. We know that a stair is somewhere between flat and straight up-and-down. Thus, the stair is an example of an inclined plane. Notice that the stair (an inclined plane) has it's own vanishing point -- and that vanishing point is located ON the vertical. Imagine grabbing that staircase, and begin to flatten it down-- can you see how it's vanishing point would begin to rise along the vertical until it eventually met up with the main VP once the staircase was flat?? I can! So - let's analyze this shot: First, find the eye level. This is your horizon line. We know that our vp's lie on this line. Next, find the vanishing point location. We are in the hallway, looking down its length. Thus, we are looking into the vanishing point. Set it. Next, determine the vertical (plum) line. If you were standing in that hallway, and you held out a plum line, the vertical would be that line. See how it's perpendicular to the horizon line? Last, determine the location of the inclined plane (staircase) vanishing point. We know that the tread and riser detail is square to the system we already constructed -- it's just it's profile that is slanted off vertical. We locate it's vanishing point on the vertical previously established. That's it! Then we render the detail in accordance with the system we just constructed. All the detail that is parallel to the length of the hallway vanish at the indicated vanishing point. All the detail that is perpendicular to the length of the hallway is rendered as parallel to the horizon line. All vertical detail is rendered parallel to the vertical line. All the detail on the inclined plane vanish at it's own vanishing point. Piece of cake!
| Summary!One-point perspective is very useful in situations where the viewer is looking directly into a vanishing point. If the center of interest moves farther and farther away from the horizon line and/or the vanishing point, we must consider .... two-point perspective!! |