
DYNAMIC
| This section describes the process of drawing dynamic figures! If you've always wondered how artists can draw figures in unique action poses, here's a process that may work for you!
|
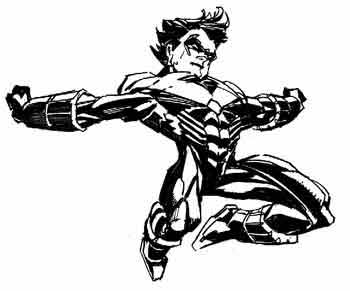
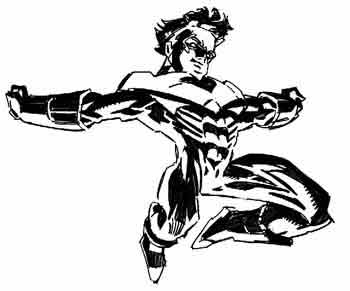
| Action Pose #1Ever wonder how some artists can draw cool looking action shots like this without any seeming effort??!!Well, read on my friend! I'm going to quickly walk you through a process that I use everyday in the course of drawing Nightwing in unique action poses! Recall that I use a lightbox for my work. A lightbox is simply a box with a light source inside it and a clear working top surface. There are many advantages to using the box, but for this figure work, the important advantages are:
|
|
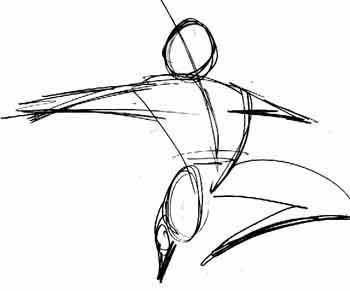
Step 1This is how it all starts! Well, this is how it can, and often does start! Sometimes, as I try to focus my mind's eye on a mental image of a figure in action, the actual detail is nebulous at best! Sometimes, all I can get onto paper quickly is a very rough gesture drawing.A gesture drawing is a very simple drawing that captures the gesture, or body language, of a figure with minimal detail! Easy! A gesture drawing can take as little as a few seconds to record! We're not making a masterpiece - we're quickly transferring an impression to paper! If the gesture isn't right - throw it out and do another! In fact, you can do quite a few gesture drawings in a very short while, and as you do them I'm sure you will find yourself approaching more and more closely the image in your mind. Here is my gesture drawing, as it captured the feel for the figure that was 'on the tip of my brain," so to speak! |
|
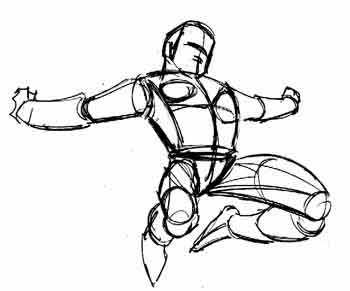
Step 2Now that we have the basic gesture drawing down, apply some very basic cylinder body detail!A cylinder body is simply a figure that is represented by simplified forms: a cylinder for the arms and legs, a modified block for the trunk, wedges for hands and feet....you get the idea! If you would like to see the basic proportions of the human body based on a standard of eight head heights, then click here. For this step, get yourself another sheet of paper and simply lay it on top of the gesture drawing. This gives you a clean surface to draw on - no clean-up required - and if you don't like the cylinder body, you can just move over to a clean area and start over!! Sometimes, this is the step where I begin my figure work. If I am warmed up, and drawing in the zone, I can get a better grip on my mental pictures and get to this cylinder body stage pretty quickly. Here too, these drawings can be rendered very quickly - say less than 20 seconds. If the position of the body is not right, do another! Keep going until you get one that is in the position/angle you want! But, no matter how we got here - we're here! Now that we have the basic form in the position we like, we can add some musculature! |
|
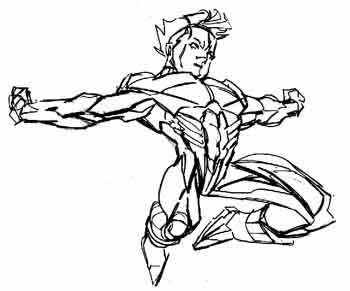
Step 3Here we don't have to worry about composition or overall figure proportion - we get to concentrate on the individual muscles around the frame we've constructed!Here's where your detailed study of anatomy will pay off! Get yourself another sheet of paper and simply lay it on top of the cylinder body. Try your best to get the major muscle groups indicated in the correct areas, with the proper points of attachment on either end. Render the muscles simply but clearly and completely, as we will apply the lighting in the next step! If you don't like your musculature - no worries! Simply put a clean area over the cylinder body and try it again! Pay close attention to the direction of the forms. Do the arms point toward you or away from you? Do the legs point toward you or away from you? Is the chest tilted toward you or away from you? These details are important to see, because they determine which muscle will overlap others. For example, consider Nightwing's left arm. It is receding away from us. Therefore, the deltoid will overlap the top portion of the bicep, and the bottom part of the bicep will overlap the top part of the forearm, and the bottom of the forearm at the cuff of the glove will overlap the hand. |
|
|
Step 4This is where it all comes together!Now that we have the major muscle groups and detail roughed in, we can go to town on the lighting! For this drawing, I've placed the light-source above the figure, so the highlights are on the upper surfaces and the shadows are on the lower surfaces! Simply go over each muscle group and render it according to your light-source! Since you've already indicated each muscle, all you need to do now is focus on determining the shading on a muscle if it is in a position to receive any light! Done! |
|
Step 5Note that since you've rendered your muscles clearly in detail in step 3, you are free to experiment with different light sources without having to do the drawing all over from scratch!For this drawing, I've gone back to the figure drawn in step 3 and I've applied a light-source from below. Just as before, I've simply determined the shading on each muscle if it is in a position to receive any light from below! Done! |
|
That's all there is to it! It's like sculpting on paper, except if you chisel too deep you can erase it or get a new piece of paper! So get out there and draw some poses you've never drawn before!! Good luck - and HAVE FUN! | |
|
|
Summary!Here's the process in a nutshell!Enjoy the little JavaScript movie of our process! To view the movie, you must have Java Script enabled on your browser! If you see a static image, that means you have Java turned off or you have a slightly older browser! Each of these drawings was done on a separate sheet of paper! No wasted time for clean-up and endless erasing!
|
)